Strategies for Handling Large WordPress Media Libraries in Dev and Staging Environments
One of the questions we get asked fairly often about WP Offload S3 is whether or not it is OK to use in development or staging environments. When done correctly, using WP Offload S3 can greatly reduce the amount of time it takes to replicate a new environment as well as the disk space needed to do so. There are plenty of ways to skin this cat though. While there is no canonical best way to do so, we’ll go over all of the strategies and outline their pros and cons. Let’s dive in, shall we?
The Problem
Let’s say we have a client with their live site at example.com. Now the client asks us to start working on a full redesign of their popular site. We need to set up a separate environment where we can safely work on this new feature in secret as well as a place for the client to review our work before they give us the thumbs up to go live.
We start by deploying the client’s WordPress site to a new server with the domain staging.example.com which contains WordPress core, the theme, and any plugins. Then we pull the database from example.com using WP Migrate DB Pro. We also need all of the images from our media library on staging as well, so we use the Media Files Addon for WP Migrate DB Pro to copy those over during the migration. The client’s site has a media library of over 5,000 items so this takes a long time for everything to copy over.
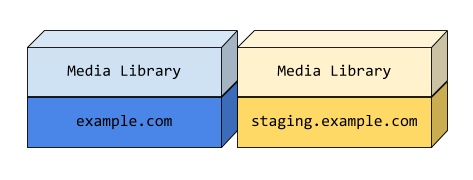
The media library is duplicated in both environments and served on the same domain as the host site.
Now the three developers who will be working on this project need to repeat this process to set up their local development environments. Later that day, the team is finally ready to get to work.
This is acceptable for small sites, but it doesn’t scale well and the cost of maintaining it goes up proportionally with the size of the media library. This is particularly painful when you go to set up a new environment for the first time. For a site with a very large media library, this can take hours or even days to download.
Centralizing the Media Library
One of the benefits of using WP Offload S3 is that it allows you to greatly reduce the amount of disk space needed for each environment. Now, rather than duplicating the media library again and again, it has been relocated to a new central location where multiple environments can share it.
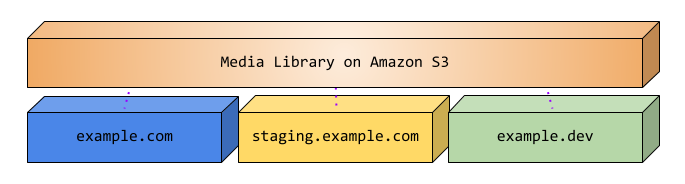
Because WP Offload S3 keeps track of the offloaded URL for each media library item, each environment is able to share those assets without having them locally.
Achievement Unlocked: new environments in a fraction of the time!
The Dark Side of Shared Resources
Did you ever share a room with a sibling? Imagine sharing one with your exact clone; nothing you have is safe! The benefits of shared resources come with their own risks, but by understanding them we will be well equipped to avoid them.
In our case, the shared resource is the Amazon S3 bucket. The primary risk of sharing an S3 bucket is that each environment potentially has the ability to upload, remove, or otherwise manipulate the contents of the bucket. Generally speaking, you only want the assets used by production to be modified from production.
When using WP Offload S3’s recommended settings, you’re actually quite safe from one file overwriting another by the same name thanks to the Object Versioning setting.

This setting adds a timestamp to the path of the object on S3 based on the time the image was offloaded. Locally, your file may have a path like this:
1 | wp-content/uploads/2017/03/sigourney-weaver.jpg |
With Object Versioning enabled (by default), within the S3 bucket this file would have a path like so:
1 | wp-content/uploads/2017/03/22195347/sigourney-weaver.jpg |
This gives the file a unique path. The media library helps prevent conflicts as well by enumerating items that would otherwise have the same filename. Without object versioning, there is still some risk that a new item added on the live site, and another item by the same name in another environment could compete for the same path in the bucket overwriting the previous file. Object Versioning makes this nearly impossible, while solving the issue of cache invalidation in the browser and on the CDN – which you should be using (don’t serve your media directly from S3 kids).
If you have enabled “Remove Files From Server”, WP Offload S3 performs additional checks to make sure that an offloaded file does not overwrite an existing file on S3 as well.
Cleaning Up
As developers, we often add lots of temporary data when thoroughly testing new features. Storage on S3 may be cheap as packing peanuts, but it ain’t free. You probably don’t want to be littering your bucket with a bunch of test junk, and paying for it. In the event that we do want to be uploading to a bucket for non-production use, we want to be able to clean up after ourselves easily.
Let’s explore a few strategies with a bit more consideration for the bucket contents and access to it.
Shared Bucket Strategy: No Access
Ideally, we should not be able to remove any assets used by production from a non-production environment. The easiest way to enforce this is to prevent WP Offload S3 from accessing your bucket at all, which is as simple as removing the access keys set in the AWS plugin. Keep in mind that WP Offload S3 requires the access keys to be set before you can configure it via the plugin’s settings screen. If you want to be able to make changes to the plugin’s settings while not allowing access to S3, you can simply replace your keys with dummy values. New media library items will not be offloaded and will be served from the local server while existing items continue to be served from your S3 bucket or custom domain.
Pros
- Easiest to implement
- Items cannot be added or removed from the production S3 bucket
- Existing offloaded media can continue to be served from the bucket/CDN
- No added cost
Cons
- New media is served differently than it will be on production
Pro Tip – Changing your AWS access keys using the plugin settings screen will be lost as soon as the database is pulled from the live site again. Use an environment-specific file to enforce this change programmatically in your code! (See below)
There are times when it may be necessary to test that new assets are being offloaded and URLs are being rewritten properly in a non-production environment. In this case, we need a different strategy.
Shared Bucket Strategy: Alternate Path
WP Offload S3’s Path setting defines the base path to the uploads (media library) root directory within the S3 bucket. By default, it mirrors the local filesystem path used by WordPress but it can be changed to whatever you like.

Because this path is saved as part of the S3 object key for every media library item, we’re free to change it without breaking URLs to existing items. When this setting is changed, the only media library items affected are those items added after the change.
The benefit of this approach is that uploads from other environments are isolated in a separate path in the bucket from those added from production. When you’re all done testing, you can simply log into the S3 console and delete the directory containing your custom path to safely remove all of your temporary objects.
It would also be wise to use different AWS IAM credentials created with a more restrictive policy for your staging/development environments. The following policy restricts write access to the custom path of your bucket:
1
2
3
4
5
6
7
8
9
10
11
12
13
14
15
16
17
18
19
20
21
22
23
24
25
26
27
{
"Version": "2012-10-17",
"Statement": [
{
"Effect": "Allow",
"Action": [
"s3:List*",
"s3:getBucketLocation"
],
"Resource": [
"arn:aws:s3:::BUCKET_NAME"
]
},
{
"Effect": "Allow",
"Action": [
"s3:DeleteObject",
"s3:Put*",
"s3:Get*"
],
"Resource": [
"arn:aws:s3:::BUCKET_NAME/staging",
"arn:aws:s3:::BUCKET_NAME/staging/*"
]
}
]
}
Pros
- New media is offloaded and served from S3 in all environments
- Media added from a non-production environment is isolated in the bucket and easy to clean up later
Cons
- Setup and maintenance of alternate IAM credentials
Alternate Bucket Strategy
We could also change the bucket setting, defining a new bucket to be used by WP Offload S3 for new media. Like we saw with the path above, the bucket is also saved to each media library item so only new media is affected by the change of bucket. Since this is essentially the same as the path-based strategy with all of the same pros and cons, we can move on to our last strategy.
Mirrored Bucket Strategy
Here we will clone the bucket used by production into a new bucket for our non-production environments to share. This is the best option for replicating the production environment as closely as possible, without the risk of contaminating or otherwise messing with the bucket used by production.
As mentioned above, the bucket used is stored in the database for each media library item. In order to ensure WP Offload S3 is using the mirrored bucket, a search and replace must be done to the database to change the old bucket name to the new one. This can be done with WP Migrate DB Pro at migration time or WP-CLI after the fact. This can be a challenge in and of itself depending on the bucket name. If the original bucket name is the same as your site’s domain for example, it could cause unintended consequences when doing a search and replace in your database to change the bucket name.
Once we have the new bucket created that we want to use, we still need to copy over all of the objects into it from the production bucket. Depending on how large your bucket is, this could take a while if we were to download everything locally and then re-upload it to the new bucket. The good news is that we can copy directly from one bucket to another! The bad news is that at the time of this writing you can’t do this from the S3 console. The easiest way to copy from one bucket to another is using the AWS CLI.
Once installed and configured, one command will get your new bucket all filled up:
1 | aws s3 sync s3://your-production-bucket s3://your-staging-bucket |
This command will copy any objects from the production bucket to the new bucket that are not already there. By default it does not delete any objects in the destination that are not in the source (although you can provide a switch to enable it), so you can continue to use the same command again in the future and it will only add missing files.
Pros
- All environments serve assets in the same way as production
- All environments can add/remove all objects from their buckets
- Cleaning up later is as easy as deleting the mirrored bucket
Cons
- Most time consuming and potentially difficult to set up
- Paying for duplicate objects
Creating an Environment-based Configuration
Manually changing settings via the UI every time you refresh your staging/local database is a recipe for disaster. For example, forgetting to switch a payment gateway to sandbox mode could cause serious problems. Forgetting to swap out IAM credentials could as well. The solution is to include this configuration in our application code. The basic goal here is to remove the database from the equation for a select few settings to enforce an environment-specific value. To do this, we will need to include some extra PHP in the app which is deployed to all environments.
All of WP Offload S3’s settings can be controlled via constants. Any settings defined within these constants take precedence over those stored in the database. Since we are simply defining constants, this code can be added to wp-config.php, anywhere before wp-settings.php is loaded.
Again, there are many ways to do this, so we’ll try to keep things as basic as possible. For more comprehensive information, you can always refer to the WP Offload S3 documentation for Settings Constants.
1 |
|
Closing Thoughts
In addition to all of the advantages you get with using Amazon S3, offloading your WordPress media library to S3 makes spinning up new environments quicker and easier. You can protect the media in your production S3 bucket by using alternate IAM credentials for each environment and enforce those environment-specific settings in your code to avoid mistakes.
Which strategy do you use for using Offload S3 in different environments? Do you have a creative solution for solving environment-based configuration in WordPress? If so, tell us all about it in the comments below!